ET-Photography

Every Picture Tells a Story

Improve Your Photos — Use Selective Focus

Not everything in your photo needs to be in sharp focus.  Your photo can be much more interesting if the main subject is in sharp focus and the rest of the photo is slightly or greatly out of focus.
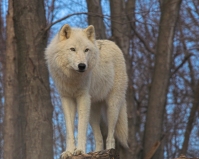
Main subject in sharp focus, background in soft focus

Main subject in sharp focus, background is slightly out of focus.

Look at the photo on the left.  The main subject, the wolf, is in very sharp focus and the background is slightly out of focus.  You can see the hairs on the wolf’s coat and, especially at normal size, can see the intensity in his eyes. Your eyes are naturally drawn to the wolf’s eyes.

Main subject in sharp focus, background very out of focus

Main subject in sharp focus, background very out of focus

The photo on the right uses selective focus to place the main subject in sharp focus and the  background is very out of focus.  Selective focus keeps your focus on the seagull (for better or worse) but you can still tell that the seagull is on a post at a place where there are boats.

How to you get selective focus?  The longer the focal length of the lens (200 mm vs 50 mm) and the wider the aperture setting (f-4 vs. f-14) the smaller narrower the field of focus will be.  By combining different lenses and aperture settings you have many choices of how you want your photo to look.  This means that you have to take your camera off of full automatic and use either the aperture priority or manual mode.

In the photo of the wolf I used a long 280 mm lens from a long distance and chose a relatively small aperture of f-14.  By focusing on the eyes of the wolf, I was able to keep the whole wolf in sharp focus and the trees in the background in relatively soft focus.  If I used a wide aperture, it’s possible that the hind quarter of the wolf would also be in soft focus and the picture would be ruined.  If I chose a smaller aperture, say f-22, the trees in the background would be in sharper focus and the photo would lose its center of interest.  If I used a short lens and got real close to the wolf, I may not be here now to write this.

In the photo of the seagull I used a shorter lens but a wide aperture.  The purpose of the photo was to to make the seagull the center of interest.  If I used a smaller aperture, more of the backgroud would be in focus.  It would be a much different photo.  The choice I made was dictated by the photo I wanted.

Choose how your photos will look.  Turn off the fully automatic settings and create your masterpiece.

Please tell me what you think or ask a question by leaving on comment.

See more of my photos at the ET-Photography website.
Make Your Photos Interesting

Using the “Rule of Thirds”

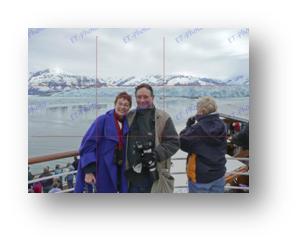
Artists have been using the “Rule of Thirds” for centuries draw the viewers’ attention to the most interesting part of the work. The rule is simple to follow. When framing your photo in the viewfinder or LCD screen draw an imaginary Tic-Tac-Toe box on your image and place the area of most interest on or near one of the crosshairs. Let’s examine the two photos shown below.


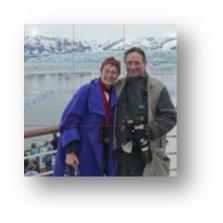
The top photo was taken of me and my wife by a fellow passenger on a cruise ship in Alaska. The photo does not draw you into it. By placing us in the dead center of the picture he included too much unexciting sky and the person on the right is a real distraction. I cropped the photo to create Photo 2. Note that our faces are right on the upper right crosshairs. Your eyes are naturally drawn to our faces and we become the center of interest of the photo. You still can tell that we’re on a ship in a cold place; in fact the glacier in the background now really adds to the scene rather than being part of a boring background.

Let’s look a another example:

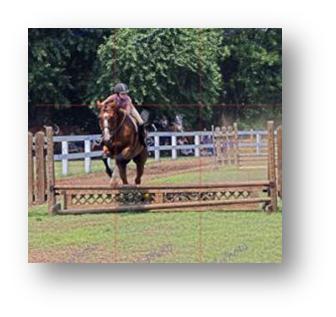
To where in the photo are your eyes drawn? In this photo your eyes are naturally drawn to the horsewoman’s face which is set on the top left crosshairs. You note the determination and concentration on her face as she jumps on fence and focuses on the next.

Remember the Rule of Thirds to improve your photos. And remember that all rules are meant to be broken J.

Showing Your Best Side

The holiday season is just around the corner and many people are looking for that special someone to share the magical time of year with. I see frequent TV commercials for many date sites including E-Harmony.com, Match.com and others. As a photographer my curiosity got the better of me (and yes, it’s just professional curiosity in case you happen to be my wife reading this J) and I perused some of the photos people uploaded to these sites. What seems to be almost universally true is that these photos were not taken specifically for showing the person at his/her best. Some were so dark you couldn’t see the person’s face or so light they looked like a ghost. Some were obviously cropped photos of the person hanging on to someone’s arm (their ex?) or with friends or family (who’s the person who is looking for a date?).

You put your photo on a date site for one reason – to advertise yourself in hope of attracting responses to your ad. Here’s where I can help. My style is sometimes called journalistic photography. I like to call it reality photography – showing people as they really are. All of us have several sides to our personality. For example, you may be just as comfortable in an old pair of jeans as you are in a tuxedo or formal evening gown so you may want to show photos of you in both. You may have a hobby and want anyone responding to share your hobby so you may want to show yourself at play with your hobby.

I could go on with many more examples but you get the idea. You are a unique individual and your date site photos should help you show you in the best light. E-mail me at ed@et-photography.com and we will set up a time for a free consultation in person or by phone.